
not on the high street (NOTHS) integration Setup
Option Setup
If you sell options on NOTHS & you want to track inventory on Mintsoft - you will need to allocate SKUs to these so that the orders import onto OMS.
You may not have the option SKU manager on your NOTHS platform by default - so you may need to apply to have this added with your NOTHS account manager.
To check if you have got the SKU manager you can edit a product from the NOTHS panel and click on the SKU management tab.
Then you will get an option to Manage SKUs.
If you do not have these options then you need to apply with your NOTHS account manager or you can simply import products against the main listing SKU (but will not work for inventory management of variant SKUS)
If you do not need to manage inventory on Mintsoft, then you can proceed without the SKU Manager.
Generate API Token
Login to your NOTHS store admin panel to create an API token.
Navigate to Settings > API tokens > Generate token
Then copy the token ready to enter it on the Mintsoft connection setup.
Setup Connection on Mintsoft
Navigate to Connect > Orders > NOTHS > Create New
Then enter the API token in the API Key field
You can also choose to:
Determine a channel
Automatically accept orders: (only if stock available in Mintsoft)
Import orders with unresolved queries: by default orders will not import when queries unresolved
Enable - Each option on a product relates to SKU: (may not be required with option SKU mapper)
OptionValueSkuMapMainProduct: Use this option if an option does not have a SKU on NOTHS, but you want to map the option value to a main SKU on OMS
Select order download delay interval: (Frequency - min 15 minutes)
Automatic Dispatch Note Download & Printing
When an order is imported via the NOTHS loader it will automatically download the NOTHS dispatch note.
The dispatch note is then stored as an order document. A barcode is also added to the dispatch note so that it can be easily scanned as part of the dispatch process.
Please make sure on Customer Account Settings (Settings > Customer Account Settings > Printing that you have the following options enabled:

System then prints NOTHS despatch note instead of the standard Mintsoft template:
Shipping Methods Mapping
You need to map the values on the NOTHS listings to a shipping service or type in Mintsoft.
You can see these values on your listings - the main terms are:
FREE = (Free delivery)
STANDARD = (Standard delivery)
EXPRESS_24 = (Next day delivery)
EXPRESS_12 = (Midday delivery)
EXPRESS_48 = (Tracked two day delivery)
SATURDAY = (Saturday Delivery)
Then navigate to Shipping > Courier Service Mapping in Mintsoft and create the mappings from NOTHS shipping values such as below:

If you leave the courier service blank as circled red above - the shipping allocation will follow rules based selections determined by weight, value & destination country of the order - set this up in Shipping > Courier Service Selection
Editing Estimated Despatch Dates for Accepting Orders
First of all - please enter you desired cut-off time for same day despatches is set by you or your fulfilment warehouse
Navigate to Settings > Customer account settings > Shipping Tab and enter value in "Time Orders must be received by for same day despatch":

Then to edit the amount of days to send to NOTHS for the estimated despatch date period please navigate to Connect > Order Integrations> NOTHS then click on accounts.

Then on the far right click despatch delivery dates;

Then enter the values one by one for each service for the number of days for despatch date & number of days delivery will take.
FREE = (Free delivery)
STANDARD = (Standard delivery)
EXPRESS_24 = (Next day delivery)
EXPRESS_12 = (Midday delivery)
EXPRESS_48 = (Tracked two day delivery)
SATURDAY = (Saturday Delivery)
For same day despatch type orders (next day / midday) up to your cut-off time - you should enter 0 as the number of days to add onto the despatch date:


The system will also take into account any holiday settings and weekend dates in the calendar
Import Error Mapping
A mapping allows the system to map the various product options that it gets from NOTHS to real products in the system.
When the system trys to import a order from NOTHS - if it is unable to determine what the product is, it will automatically create a new product mapping error that needs to be mapped to products manually in the system.
It will display an error on the dashboard if it is unable to map directly to a product:

Mapping a Manual Product - Example:
You can either click on the link on the dashboard error, or navigate to Connect > Order Integrations> NOTHS > Accounts > Mappings:
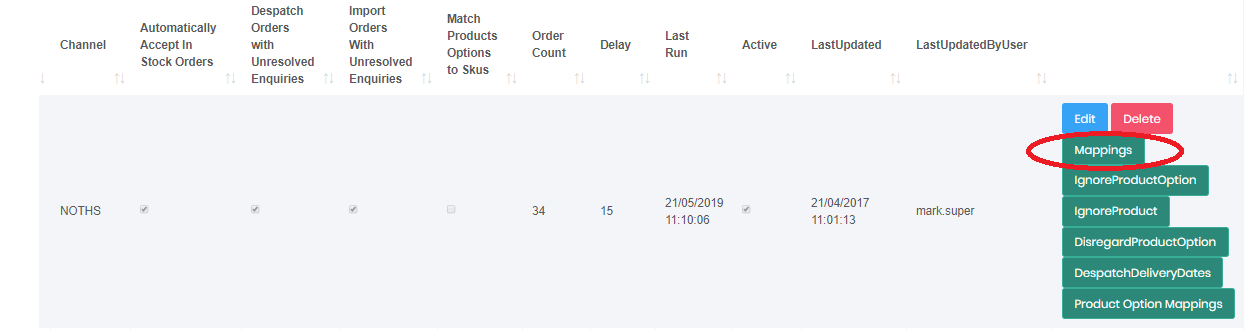
Any failed mappings will display a message stating it needs to be associated to a product, click the edit button in order to map it:

SKU or Ignored Option? - Check the product option before you map it - if the option on the error is not a SKU (for example, a personalisation) - you should add it to the ignored product option list instead of making a product mapping
If the option or product relates to a product then map it manually as below:

Add the product, then tick active and click Create to save the manual mapping.
Once created, you can click Edit to add further details:


Ignore Option
If the option title does not relate to a product - then it should be added to the ignored product option list:

Copy / paste or type the ignored option value and click create:
